By the end of this lab, you will be able to:
• Understand RIP fundamentals and distance-vector routing protocols
• Configure RIP Version 1 (classful routing protocol)
• Configure RIP Version 2 with classless routing and VLSM support
• Implement RIP authentication (MD5) for security
• Configure RIPng (RIP next generation) for IPv6 networks
• Compare and contrast RIPv1, RIPv2, and RIPng
• Troubleshoot RIP routing issues and verify convergence
• Understand RIP timers, metrics, and limitations
• Implement route summarization and passive interfaces
Lab Topology Description:
This lab features a three-router topology (R1, R2, R3) connected in series. The design allows you to observe RIP behavior across multiple hops, understand routing updates, and test various RIP features including version differences, authentication, and IPv6 support.
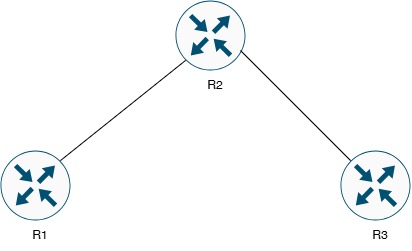
• R1 GigabitEthernet0/0 ↔ R2 GigabitEthernet0/0 (Link 1)
• R2 GigabitEthernet0/1 ↔ R3 GigabitEthernet0/1 (Link 2)
Topology Characteristics:
• Serial topology (R1 -- R2 -- R3)
• Each router has loopback interfaces for testing
• Demonstrates multi-hop RIP behavior
• Supports both IPv4 (RIPv1/v2) and IPv6 (RIPng) configuration
Network Addressing Scheme:
| Device | Interface | IPv4 Address | Subnet Mask | Description |
|---|---|---|---|---|
| R1 | GigabitEthernet0/0 | 10.1.12.1 | 255.255.255.0 | Link to R2 |
| R1 | Loopback0 | 10.1.1.1 | 255.255.255.0 | R1 LAN Network |
| R1 | Loopback1 | 10.1.11.1 | 255.255.255.0 | R1 Additional Network |
| R2 | GigabitEthernet0/0 | 10.1.12.2 | 255.255.255.0 | Link to R1 |
| R2 | GigabitEthernet0/1 | 10.2.23.2 | 255.255.255.0 | Link to R3 |
| R2 | Loopback0 | 10.2.2.2 | 255.255.255.0 | R2 LAN Network |
| R3 | GigabitEthernet0/1 | 10.2.23.3 | 255.255.255.0 | Link to R2 |
| R3 | Loopback0 | 10.3.3.3 | 255.255.255.0 | R3 LAN Network |
| R3 | Loopback1 | 10.3.33.3 | 255.255.255.0 | R3 Additional Network |
| Device | Interface | IPv6 Address | Prefix | Description |
|---|---|---|---|---|
| R1 | GigabitEthernet0/0 | 2001:DB8:12::1 | /64 | Link to R2 |
| R1 | Loopback0 | 2001:DB8:1::1 | /64 | R1 LAN Network |
| R2 | GigabitEthernet0/0 | 2001:DB8:12::2 | /64 | Link to R1 |
| R2 | GigabitEthernet0/1 | 2001:DB8:23::2 | /64 | Link to R3 |
| R2 | Loopback0 | 2001:DB8:2::2 | /64 | R2 LAN Network |
| R3 | GigabitEthernet0/1 | 2001:DB8:23::3 | /64 | Link to R2 |
| R3 | Loopback0 | 2001:DB8:3::3 | /64 | R3 LAN Network |
✓ Understanding of IP addressing and subnetting
✓ Knowledge of distance-vector routing protocol concepts
✓ Familiarity with Cisco IOS CLI and configuration modes
✓ Understanding of routing table operations
✓ Basic knowledge of IPv6 addressing (for RIPng section)
✓ Access to Cisco routers (physical or GNS3/EVE-NG/Packet Tracer)
✓ Console or SSH access to all devices
✓ All devices should be in clean configuration state
Business Context:
Your organization is running a small branch network with three routers. The network team has decided to implement RIP as the interior gateway protocol (IGP). You are tasked with:
- Implementing RIPv1 to understand classful routing behavior
- Migrating to RIPv2 for classless routing and VLSM support
- Securing RIP updates with MD5 authentication
- Deploying RIPng for IPv6 network connectivity
- Optimizing RIP with passive interfaces and summarization
- Documenting the differences between RIP versions
What is RIP (Routing Information Protocol)?
RIP is one of the oldest distance-vector routing protocols, defined in RFC 1058 (RIPv1) and RFC 2453 (RIPv2). It uses hop count as its metric and is limited to 15 hops maximum.
| Feature | RIPv1 | RIPv2 | RIPng |
|---|---|---|---|
| RFC | RFC 1058 | RFC 2453 | RFC 2080 |
| Classful/Classless | Classful | Classless | Classless |
| VLSM Support | No | Yes | Yes |
| Subnet Mask | Not sent | Sent with updates | IPv6 prefix |
| Authentication | No | Yes (Plain/MD5) | IPsec |
| Update Method | Broadcast | Multicast (224.0.0.9) | Multicast (FF02::9) |
| Protocol | IPv4 | IPv4 | IPv6 |
| Max Hop Count | 15 | 15 | 15 |
| Administrative Distance | 120 | 120 | 120 |
| Update Timer | 30 seconds | 30 seconds | 30 seconds |
RIP Timers
- Update Timer (30 seconds): How often routing updates are sent
- Invalid Timer (180 seconds): How long to wait before declaring a route invalid
- Holddown Timer (180 seconds): How long to wait before accepting new information about a route
- Flush Timer (240 seconds): How long before a route is removed from the routing table
• Maximum 15 hops (16 is unreachable)
• Slow convergence compared to modern protocols
• Uses full routing table updates (not incremental)
• High bandwidth consumption on large networks
• No support for equal-cost load balancing beyond 4 paths
• Not suitable for large enterprise networks
📌 Task 1: Basic IPv4 Interface Configuration
Objective: Configure IPv4 addresses on all router interfaces and verify connectivity.
Step 1.1: Configure R1 Interfaces
Router> enable
Router# configure terminal
Router(config)# hostname R1
R1(config)#
! Configure interface to R2
R1(config)# interface GigabitEthernet0/0
R1(config-if)# description ** Link to R2 **
R1(config-if)# ip address 10.1.12.1 255.255.255.0
R1(config-if)# no shutdown
R1(config-if)# exit
! Configure Loopback interfaces
R1(config)# interface Loopback0
R1(config-if)# description ** R1 LAN Network **
R1(config-if)# ip address 10.1.1.1 255.255.255.0
R1(config-if)# exit
R1(config)# interface Loopback1
R1(config-if)# description ** R1 Additional Network **
R1(config-if)# ip address 10.1.11.1 255.255.255.0
R1(config-if)# exit
R1(config)# end
R1# write memory
Step 1.2: Configure R2 Interfaces
Router> enable
Router# configure terminal
Router(config)# hostname R2
R2(config)#
! Configure interface to R1
R2(config)# interface GigabitEthernet0/0
R2(config-if)# description ** Link to R1 **
R2(config-if)# ip address 10.1.12.2 255.255.255.0
R2(config-if)# no shutdown
R2(config-if)# exit
! Configure interface to R3
R2(config)# interface GigabitEthernet0/1
R2(config-if)# description ** Link to R3 **
R2(config-if)# ip address 10.2.23.2 255.255.255.0
R2(config-if)# no shutdown
R2(config-if)# exit
! Configure Loopback interface
R2(config)# interface Loopback0
R2(config-if)# description ** R2 LAN Network **
R2(config-if)# ip address 10.2.2.2 255.255.255.0
R2(config-if)# exit
R2(config)# end
R2# write memory
Step 1.3: Configure R3 Interfaces
Router> enable
Router# configure terminal
Router(config)# hostname R3
R3(config)#
! Configure interface to R2
R3(config)# interface GigabitEthernet0/1
R3(config-if)# description ** Link to R2 **
R3(config-if)# ip address 10.2.23.3 255.255.255.0
R3(config-if)# no shutdown
R3(config-if)# exit
! Configure Loopback interfaces
R3(config)# interface Loopback0
R3(config-if)# description ** R3 LAN Network **
R3(config-if)# ip address 10.3.3.3 255.255.255.0
R3(config-if)# exit
R3(config)# interface Loopback1
R3(config-if)# description ** R3 Additional Network **
R3(config-if)# ip address 10.3.33.3 255.255.255.0
R3(config-if)# exit
R3(config)# end
R3# write memory
Step 1.4: Verify IPv4 Connectivity
R1# show ip interface brief
R1# ping 10.1.12.2
! On R2:
R2# show ip interface brief
R2# ping 10.1.12.1
R2# ping 10.2.23.3
! On R3:
R3# show ip interface brief
R3# ping 10.2.23.2
• All interfaces should be in "up/up" state
• Ping tests between directly connected routers should succeed
• R1 can ping R2, R2 can ping R1 and R3, R3 can ping R2
📌 Task 2: Configure RIP Version 1 (Classful Routing)
Objective: Implement RIPv1 and understand classful routing behavior.
• Classful routing protocol (does not send subnet masks)
• Uses broadcast (255.255.255.255) for updates
• No authentication support
• Automatic summarization at classful boundaries
• No VLSM support
Step 2.1: Configure RIPv1 on R1
R1# configure terminal
! Enable RIP routing process
R1(config)# router rip
! Advertise networks (use classful networks only)
R1(config-router)# network 10.0.0.0
R1(config-router)# exit
R1(config)# end
R1# write memory
Step 2.2: Configure RIPv1 on R2
R2# configure terminal
! Enable RIP routing process
R2(config)# router rip
! Advertise networks
R2(config-router)# network 10.0.0.0
R2(config-router)# exit
R2(config)# end
R2# write memory
Step 2.3: Configure RIPv1 on R3
R3# configure terminal
! Enable RIP routing process
R3(config)# router rip
! Advertise networks
R3(config-router)# network 10.0.0.0
R3(config-router)# exit
R3(config)# end
R3# write memory
In RIPv1, you can only specify classful networks (Class A, B, or C). The "network 10.0.0.0" command advertises ALL interfaces in the 10.0.0.0/8 network. RIPv1 automatically summarizes at classful boundaries.
Step 2.4: Verify RIPv1 Configuration
R1# show ip protocols
R1# show ip route
R1# show ip route rip
R1# show ip rip database
! Debug RIP updates (use carefully)
R1# debug ip rip
! Let it run for 30 seconds to see updates
R1# undebug all
• RIP routing process should be active on all routers
• Routing tables should contain RIP-learned routes (marked with "R")
• All networks should be reachable
• show ip protocols should display "Routing Protocol is 'rip'" and "Sending updates every 30 seconds"
• Automatic summarization should be enabled
Step 2.5: Test RIPv1 Connectivity
R1# ping 10.2.2.2
R1# ping 10.3.3.3
R1# ping 10.3.33.3
! On R3 - Test end-to-end connectivity:
R3# ping 10.1.1.1
R3# ping 10.1.11.1
R3# ping 10.2.2.2
! View routing table
R1# show ip route
📌 Task 3: Migrate to RIP Version 2 (Classless Routing)
Objective: Upgrade to RIPv2 for classless routing, VLSM support, and authentication capabilities.
• Classless routing protocol (sends subnet masks)
• Uses multicast (224.0.0.9) instead of broadcast
• Supports authentication (plain text and MD5)
• Supports VLSM and CIDR
• Manual summarization capability
• Can disable auto-summarization
Step 3.1: Upgrade R1 to RIPv2
R1# configure terminal
! Enter RIP configuration mode
R1(config)# router rip
! Specify RIP version 2
R1(config-router)# version 2
! Disable automatic summarization (recommended)
R1(config-router)# no auto-summary
R1(config-router)# exit
R1(config)# end
R1# write memory
Step 3.2: Upgrade R2 to RIPv2
R2# configure terminal
R2(config)# router rip
R2(config-router)# version 2
R2(config-router)# no auto-summary
R2(config-router)# exit
R2(config)# end
R2# write memory
Step 3.3: Upgrade R3 to RIPv2
R3# configure terminal
R3(config)# router rip
R3(config-router)# version 2
R3(config-router)# no auto-summary
R3(config-router)# exit
R3(config)# end
R3# write memory
Step 3.4: Verify RIPv2 Configuration
R1# show ip protocols
! Should show "Routing Protocol is 'rip'" and "Version 2"
R1# show ip route rip
! Routes should now include subnet masks
R1# show ip rip database
! Debug RIPv2 updates
R1# debug ip rip
! Observe multicast updates to 224.0.0.9
R1# undebug all
• show ip protocols should display "Routing Protocol is 'rip'" with "Sending updates every 30 seconds, version 2"
• Automatic summarization should be disabled
• Updates should be sent to multicast address 224.0.0.9
• Subnet masks should be included in routing updates
• All networks remain reachable
📌 Task 4: Configure RIPv2 Authentication (MD5)
Objective: Secure RIP updates with MD5 authentication to prevent unauthorized routing updates.
RIPv2 supports two types of authentication:
• Plain text: Password sent in clear text (not secure)
• MD5: Password hashed with MD5 algorithm (recommended)
Authentication is configured per interface using key chains.
Step 4.1: Configure Authentication on R1
R1# configure terminal
! Create key chain
R1(config)# key chain RIP_KEY
R1(config-keychain)# key 1
R1(config-keychain-key)# key-string CCNP2026
R1(config-keychain-key)# exit
R1(config-keychain)# exit
! Apply authentication to interface
R1(config)# interface GigabitEthernet0/0
R1(config-if)# ip rip authentication mode md5
R1(config-if)# ip rip authentication key-chain RIP_KEY
R1(config-if)# exit
R1(config)# end
R1# write memory
Step 4.2: Configure Authentication on R2
R2# configure terminal
! Create key chain
R2(config)# key chain RIP_KEY
R2(config-keychain)# key 1
R2(config-keychain-key)# key-string CCNP2026
R2(config-keychain-key)# exit
R2(config-keychain)# exit
! Apply authentication to interfaces
R2(config)# interface GigabitEthernet0/0
R2(config-if)# ip rip authentication mode md5
R2(config-if)# ip rip authentication key-chain RIP_KEY
R2(config-if)# exit
R2(config)# interface GigabitEthernet0/1
R2(config-if)# ip rip authentication mode md5
R2(config-if)# ip rip authentication key-chain RIP_KEY
R2(config-if)# exit
R2(config)# end
R2# write memory
Step 4.3: Configure Authentication on R3
R3# configure terminal
! Create key chain
R3(config)# key chain RIP_KEY
R3(config-keychain)# key 1
R3(config-keychain-key)# key-string CCNP2026
R3(config-keychain-key)# exit
R3(config-keychain)# exit
! Apply authentication to interface
R3(config)# interface GigabitEthernet0/1
R3(config-if)# ip rip authentication mode md5
R3(config-if)# ip rip authentication key-chain RIP_KEY
R3(config-if)# exit
R3(config)# end
R3# write memory
• Key chain names are case-sensitive
• Key-string (password) must match EXACTLY on both sides
• Key numbers must match
• If authentication fails, RIP adjacency will not form
• Authentication is configured per interface, not globally
Step 4.4: Verify Authentication
! Verify key chain configuration
R1# show key chain
! Verify interface authentication
R1# show ip interface GigabitEthernet0/0 | include authentication
! Check RIP neighbors
R1# show ip protocols
! Verify routes are still present
R1# show ip route rip
! Test connectivity
R1# ping 10.3.3.3
• Key chains should be configured on all routers
• show ip interface should display MD5 authentication enabled
• RIP routes should still be present in routing table
• All networks should remain reachable
• Authentication should be working (no adjacency issues)
Step 4.5: Test Authentication Failure
R1# configure terminal
R1(config)# key chain RIP_KEY
R1(config-keychain)# key 1
R1(config-keychain-key)# key-string WRONG_PASSWORD
R1(config-keychain-key)# end
! Wait 30 seconds for updates
! Check routing table
R1# show ip route rip
! Routes from R2 should disappear after invalid timer expires
! Restore correct password
R1# configure terminal
R1(config)# key chain RIP_KEY
R1(config-keychain)# key 1
R1(config-keychain-key)# key-string CCNP2026
R1(config-keychain-key)# end
! Routes should reappear
R1# show ip route rip
📌 Task 5: Configure Passive Interfaces
Objective: Optimize RIP by preventing unnecessary routing updates on interfaces where no RIP neighbors exist.
A passive interface in RIP:
• Does NOT send RIP updates out the interface
• Still advertises the network to other RIP neighbors
• Still listens for incoming RIP updates (can receive)
• Reduces unnecessary traffic on LAN segments
• Improves security by not advertising routing protocol information
Step 5.1: Configure Passive Interfaces on R1
R1# configure terminal
R1(config)# router rip
! Make loopback interfaces passive (no RIP neighbors on LANs)
R1(config-router)# passive-interface Loopback0
R1(config-router)# passive-interface Loopback1
R1(config-router)# exit
R1(config)# end
R1# write memory
Step 5.2: Configure Passive Interfaces on R2
R2# configure terminal
R2(config)# router rip
R2(config-router)# passive-interface Loopback0
R2(config-router)# exit
R2(config)# end
R2# write memory
Step 5.3: Configure Passive Interfaces on R3
R3# configure terminal
R3(config)# router rip
R3(config-router)# passive-interface Loopback0
R3(config-router)# passive-interface Loopback1
R3(config-router)# exit
R3(config)# end
R3# write memory
Step 5.4: Verify Passive Interface Configuration
R1# show ip protocols
! Should list passive interfaces
R1# show ip protocols | section Passive
! Verify routes are still present
R1# show ip route rip
• show ip protocols should list passive interfaces
• Loopback networks should still appear in routing tables
• No RIP updates sent out loopback interfaces
• All inter-router connectivity remains functional
You can also use "passive-interface default" to make all interfaces passive by default, then explicitly enable RIP on specific interfaces:
router rip passive-interface default no passive-interface GigabitEthernet0/0This is more secure and prevents accidental RIP advertisements.
📌 Task 6: Configure RIPng for IPv6
Objective: Implement RIPng (RIP next generation) for IPv6 routing.
• Configured per-interface (not globally)
• Uses IPv6 multicast address FF02::9
• No network statements required
• Uses UDP port 521
• Authentication via IPsec (not key chains)
Step 6.1: Enable IPv6 and Configure Addresses on R1
R1# configure terminal
! Enable IPv6 routing
R1(config)# ipv6 unicast-routing
! Configure IPv6 addresses
R1(config)# interface GigabitEthernet0/0
R1(config-if)# ipv6 address 2001:DB8:12::1/64
R1(config-if)# exit
R1(config)# interface Loopback0
R1(config-if)# ipv6 address 2001:DB8:1::1/64
R1(config-if)# exit
R1(config)# end
R1# write memory
Step 6.2: Enable IPv6 and Configure Addresses on R2
R2# configure terminal
! Enable IPv6 routing
R2(config)# ipv6 unicast-routing
! Configure IPv6 addresses
R2(config)# interface GigabitEthernet0/0
R2(config-if)# ipv6 address 2001:DB8:12::2/64
R2(config-if)# exit
R2(config)# interface GigabitEthernet0/1
R2(config-if)# ipv6 address 2001:DB8:23::2/64
R2(config-if)# exit
R2(config)# interface Loopback0
R2(config-if)# ipv6 address 2001:DB8:2::2/64
R2(config-if)# exit
R2(config)# end
R2# write memory
Step 6.3: Enable IPv6 and Configure Addresses on R3
R3# configure terminal
! Enable IPv6 routing
R3(config)# ipv6 unicast-routing
! Configure IPv6 addresses
R3(config)# interface GigabitEthernet0/1
R3(config-if)# ipv6 address 2001:DB8:23::3/64
R3(config-if)# exit
R3(config)# interface Loopback0
R3(config-if)# ipv6 address 2001:DB8:3::3/64
R3(config-if)# exit
R3(config)# end
R3# write memory
Step 6.4: Configure RIPng on R1
R1# configure terminal
! Create RIPng process (name it CCNP_RIPng)
R1(config)# ipv6 router rip CCNP_RIPng
R1(config-rtr)# exit
! Enable RIPng on interfaces
R1(config)# interface GigabitEthernet0/0
R1(config-if)# ipv6 rip CCNP_RIPng enable
R1(config-if)# exit
R1(config)# interface Loopback0
R1(config-if)# ipv6 rip CCNP_RIPng enable
R1(config-if)# exit
R1(config)# end
R1# write memory
Step 6.5: Configure RIPng on R2
R2# configure terminal
! Create RIPng process
R2(config)# ipv6 router rip CCNP_RIPng
R2(config-rtr)# exit
! Enable RIPng on interfaces
R2(config)# interface GigabitEthernet0/0
R2(config-if)# ipv6 rip CCNP_RIPng enable
R2(config-if)# exit
R2(config)# interface GigabitEthernet0/1
R2(config-if)# ipv6 rip CCNP_RIPng enable
R2(config-if)# exit
R2(config)# interface Loopback0
R2(config-if)# ipv6 rip CCNP_RIPng enable
R2(config-if)# exit
R2(config)# end
R2# write memory
Step 6.6: Configure RIPng on R3
R3# configure terminal
! Create RIPng process
R3(config)# ipv6 router rip CCNP_RIPng
R3(config-rtr)# exit
! Enable RIPng on interfaces
R3(config)# interface GigabitEthernet0/1
R3(config-if)# ipv6 rip CCNP_RIPng enable
R3(config-if)# exit
R3(config)# interface Loopback0
R3(config-if)# ipv6 rip CCNP_RIPng enable
R3(config-if)# exit
R3(config)# end
R3# write memory
Step 6.7: Verify RIPng Configuration
! Check IPv6 routing table
R1# show ipv6 route
R1# show ipv6 route rip
! Check RIPng process
R1# show ipv6 protocols
! Check RIPng database
R1# show ipv6 rip
R1# show ipv6 rip database
! Verify IPv6 connectivity
R1# ping ipv6 2001:DB8:3::3
R1# traceroute ipv6 2001:DB8:3::3
• IPv6 routing should be enabled on all routers
• RIPng process should be running
• IPv6 routes learned via RIPng should appear in routing table (marked with "R")
• IPv6 connectivity should work end-to-end
• show ipv6 protocols should display RIPng information
- ☐ Step 1: All IPv4 interfaces are configured and in "up/up" state
- ☐ Step 2: Direct IPv4 connectivity between adjacent routers works
- ☐ Step 3: RIP routing process is enabled on all routers
- ☐ Step 4: RIPv2 is configured and running (show ip protocols)
- ☐ Step 5: Auto-summarization is disabled (no auto-summary)
- ☐ Step 6: All networks are advertised in RIP
- ☐ Step 7: RIP routes appear in routing table on all routers
- ☐ Step 8: MD5 authentication is configured on all interfaces
- ☐ Step 9: Key chains are correctly configured with matching passwords
- ☐ Step 10: Passive interfaces are configured on loopback interfaces
- ☐ Step 11: End-to-end IPv4 connectivity works (ping tests)
- ☐ Step 12: IPv6 unicast routing is enabled on all routers
- ☐ Step 13: All IPv6 interfaces are configured with addresses
- ☐ Step 14: RIPng process is created on all routers
- ☐ Step 15: RIPng is enabled on appropriate interfaces
- ☐ Step 16: IPv6 RIP routes appear in routing table
- ☐ Step 17: End-to-end IPv6 connectivity works
- ☐ Step 18: Configuration is saved on all routers (write memory)
R1 - Complete Final Configuration
! R1 Complete Configuration - RIPv2 and RIPng
!
hostname R1
!
! Enable IPv6 routing
ipv6 unicast-routing
!
! === Interface Configuration ===
!
interface Loopback0
description ** R1 LAN Network **
ip address 10.1.1.1 255.255.255.0
ipv6 address 2001:DB8:1::1/64
ipv6 rip CCNP_RIPng enable
!
interface Loopback1
description ** R1 Additional Network **
ip address 10.1.11.1 255.255.255.0
!
interface GigabitEthernet0/0
description ** Link to R2 **
ip address 10.1.12.1 255.255.255.0
ip rip authentication mode md5
ip rip authentication key-chain RIP_KEY
ipv6 address 2001:DB8:12::1/64
ipv6 rip CCNP_RIPng enable
no shutdown
!
! === RIPv2 Configuration ===
!
router rip
version 2
network 10.0.0.0
no auto-summary
passive-interface Loopback0
passive-interface Loopback1
!
! === RIPng Configuration ===
!
ipv6 router rip CCNP_RIPng
!
! === Key Chain for Authentication ===
!
key chain RIP_KEY
key 1
key-string CCNP2026
!
end
R2 - Complete Final Configuration
! R2 Complete Configuration - RIPv2 and RIPng
!
hostname R2
!
! Enable IPv6 routing
ipv6 unicast-routing
!
! === Interface Configuration ===
!
interface Loopback0
description ** R2 LAN Network **
ip address 10.2.2.2 255.255.255.0
ipv6 address 2001:DB8:2::2/64
ipv6 rip CCNP_RIPng enable
!
interface GigabitEthernet0/0
description ** Link to R1 **
ip address 10.1.12.2 255.255.255.0
ip rip authentication mode md5
ip rip authentication key-chain RIP_KEY
ipv6 address 2001:DB8:12::2/64
ipv6 rip CCNP_RIPng enable
no shutdown
!
interface GigabitEthernet0/1
description ** Link to R3 **
ip address 10.2.23.2 255.255.255.0
ip rip authentication mode md5
ip rip authentication key-chain RIP_KEY
ipv6 address 2001:DB8:23::2/64
ipv6 rip CCNP_RIPng enable
no shutdown
!
! === RIPv2 Configuration ===
!
router rip
version 2
network 10.0.0.0
no auto-summary
passive-interface Loopback0
!
! === RIPng Configuration ===
!
ipv6 router rip CCNP_RIPng
!
! === Key Chain for Authentication ===
!
key chain RIP_KEY
key 1
key-string CCNP2026
!
end
R3 - Complete Final Configuration
! R3 Complete Configuration - RIPv2 and RIPng
!
hostname R3
!
! Enable IPv6 routing
ipv6 unicast-routing
!
! === Interface Configuration ===
!
interface Loopback0
description ** R3 LAN Network **
ip address 10.3.3.3 255.255.255.0
ipv6 address 2001:DB8:3::3/64
ipv6 rip CCNP_RIPng enable
!
interface Loopback1
description ** R3 Additional Network **
ip address 10.3.33.3 255.255.255.0
!
interface GigabitEthernet0/1
description ** Link to R2 **
ip address 10.2.23.3 255.255.255.0
ip rip authentication mode md5
ip rip authentication key-chain RIP_KEY
ipv6 address 2001:DB8:23::3/64
ipv6 rip CCNP_RIPng enable
no shutdown
!
! === RIPv2 Configuration ===
!
router rip
version 2
network 10.0.0.0
no auto-summary
passive-interface Loopback0
passive-interface Loopback1
!
! === RIPng Configuration ===
!
ipv6 router rip CCNP_RIPng
!
! === Key Chain for Authentication ===
!
key chain RIP_KEY
key 1
key-string CCNP2026
!
end
show ip route
show ip route rip
show ip rip database
show running-config | section router rip
show ip interface GigabitEthernet0/0
show key chain
show ipv6 route
show ipv6 route rip
show ipv6 rip
show ipv6 rip database
show ipv6 interface brief
debug ip rip events
debug ipv6 rip
undebug all
ping 10.3.3.3 source 10.1.1.1
traceroute 10.3.3.3
ping ipv6 2001:DB8:3::3
traceroute ipv6 2001:DB8:3::3
❌ Problem 1: RIP Adjacency Not Forming
Symptoms:
- No RIP routes in routing table
- show ip route rip shows no routes
- No RIP updates being received
Troubleshooting Steps:
R1# show ip protocols
! Should show "Routing Protocol is 'rip'"
! Step 2: Verify network statements
R1# show running-config | section router rip
! Step 3: Verify interface status
R1# show ip interface brief
! Step 4: Check if updates are being sent/received
R1# debug ip rip
! Wait for 30 seconds
R1# undebug all
! Step 5: Verify RIP version matches
R1# show ip protocols | include version
Common Causes:
- RIP not enabled on router
- Network statement missing or incorrect
- Interface is down
- Version mismatch (RIPv1 vs RIPv2)
- Passive interface configured on wrong interface
Solution:
R1(config)# router rip
R1(config-router)# version 2
R1(config-router)# network 10.0.0.0
R1(config-router)# no auto-summary
❌ Problem 2: Authentication Failure
Symptoms:
- RIP routes disappear after configuring authentication
- Routes from specific neighbors missing
- show ip protocols shows authentication enabled but no routes
Troubleshooting Steps:
R1# show key chain
! Step 2: Verify interface authentication
R1# show running-config interface GigabitEthernet0/0
! Step 3: Check for authentication errors
R1# debug ip rip
! Look for "invalid authentication" messages
R1# undebug all
! Step 4: Verify key-string matches on both sides
! Check on R1 and R2
Common Causes:
- Key-string mismatch (case-sensitive)
- Key number mismatch
- Key chain name mismatch
- Authentication only configured on one side
- Wrong authentication mode (text vs MD5)
Solution:
R1# show key chain
R2# show key chain
! Reconfigure if needed
R1(config)# key chain RIP_KEY
R1(config-keychain)# key 1
R1(config-keychain-key)# key-string CCNP2026
R1(config)# interface GigabitEthernet0/0
R1(config-if)# ip rip authentication mode md5
R1(config-if)# ip rip authentication key-chain RIP_KEY
❌ Problem 3: Routes Not Appearing in Routing Table
Symptoms:
- RIP is running but specific routes are missing
- show ip rip database shows routes but not in routing table
- Connectivity to some networks fails
Troubleshooting Steps:
R1# show ip rip database
! Routes should appear here even if not in routing table
! Step 2: Check routing table
R1# show ip route
! Step 3: Check for better routes from other protocols
R1# show ip route [network]
! Step 4: Verify auto-summary is disabled
R1# show ip protocols | include auto
! Step 5: Check maximum paths
R1# show ip protocols | include Maximum
Common Causes:
- Better route from another protocol (lower AD)
- Auto-summarization causing issues
- Passive interface on wrong interface
- Network not advertised
- Split horizon preventing route advertisement
Solution:
R1(config)# router rip
R1(config-router)# no auto-summary
! Verify network statements
R1(config-router)# network 10.0.0.0
! Check for passive interfaces
R1# show ip protocols | section Passive
❌ Problem 4: RIPng Not Working (IPv6)
Symptoms:
- No IPv6 RIP routes in routing table
- show ipv6 route rip shows nothing
- IPv6 connectivity fails between routers
Troubleshooting Steps:
R1# show ipv6 interface brief
! Step 2: Verify RIPng process exists
R1# show ipv6 protocols
! Step 3: Verify RIPng is enabled on interfaces
R1# show ipv6 interface GigabitEthernet0/0 | include RIP
! Step 4: Check RIPng database
R1# show ipv6 rip database
! Step 5: Debug RIPng
R1# debug ipv6 rip
R1# undebug all
Common Causes:
- IPv6 unicast-routing not enabled
- RIPng process not created
- RIPng not enabled on interfaces
- Process name mismatch
- Link-local addresses not generated
Solution:
R1(config)# ipv6 unicast-routing
! Create RIPng process
R1(config)# ipv6 router rip CCNP_RIPng
! Enable RIPng on interfaces
R1(config)# interface GigabitEthernet0/0
R1(config-if)# ipv6 rip CCNP_RIPng enable
❌ Problem 5: Slow Convergence
Symptoms:
- Routes take long time to appear after link comes up
- Routes take long time to be removed after link failure
- Network downtime during convergence
Understanding:
RIP has inherently slow convergence due to its periodic update mechanism (30-second updates) and timers.
R1# show ip protocols | include timer
! Default timers:
! Update: 30 seconds
! Invalid: 180 seconds
! Holddown: 180 seconds
! Flush: 240 seconds
Solution (Optional - Adjust Timers):
R1(config)# router rip
R1(config-router)# timers basic 10 60 60 80
! Format: update invalid holddown flush
! Must be configured on ALL routers
• Aggressive timers increase CPU and bandwidth usage
• All routers must use the same timers
• Not recommended for production without thorough testing
• Consider using a modern protocol (EIGRP, OSPF) for faster convergence
1. RIP Version Comparison
When to Use Each Version:
- RIPv1: Legacy networks only, classful routing required
- RIPv2: Small to medium networks, VLSM needed, authentication required
- RIPng: IPv6 networks, simple configuration
2. RIP Best Practices
- Always use RIPv2 over RIPv1 (unless legacy requirement)
- Disable auto-summarization with "no auto-summary"
- Configure passive interfaces on LAN segments
- Use MD5 authentication for security
- Limit RIP to small networks (max 15 hops)
- Consider modern protocols for larger deployments
3. RIP Limitations
- Maximum 15 hops (16 = unreachable)
- Slow convergence (update timer = 30 seconds)
- Hop count is the only metric (doesn't consider bandwidth)
- Sends full routing table every 30 seconds
- High bandwidth consumption
- No support for traffic engineering
4. Administrative Distance
| Protocol | AD Value | Preference |
|---|---|---|
| Connected | 0 | Highest |
| Static | 1 | Very High |
| EIGRP | 90 | High |
| OSPF | 110 | Medium |
| RIP | 120 | Low |
RIP has the highest AD among common IGPs, making it the least preferred when multiple protocols are running.
What You Accomplished:
✅ Completed Configuration Tasks:
- Configured IPv4 addresses on all router interfaces
- Implemented RIPv1 (classful routing)
- Migrated to RIPv2 (classless routing with VLSM)
- Configured MD5 authentication for RIPv2
- Implemented passive interfaces for optimization
- Configured IPv6 addresses and routing
- Deployed RIPng for IPv6 networks
- Verified and tested all RIP configurations
- Documented complete working configurations
You have successfully completed Lab 10.3: RIP - Routing Information Protocol (v1, v2 & RIPng).
Lab Completion Date: _________________
Instructor Signature: _________________
Student Name: _________________
Skills Verified:
☑ RIPv1 configuration and classful routing
☑ RIPv2 configuration and classless routing
☑ RIP MD5 authentication implementation
☑ Passive interface configuration
☑ RIPng for IPv6 configuration
☑ RIP verification and troubleshooting
CCNP Progress: Distance-Vector Protocols ✓ | Layer 3 Routing ✓